
Vibescope user manual
【上面】
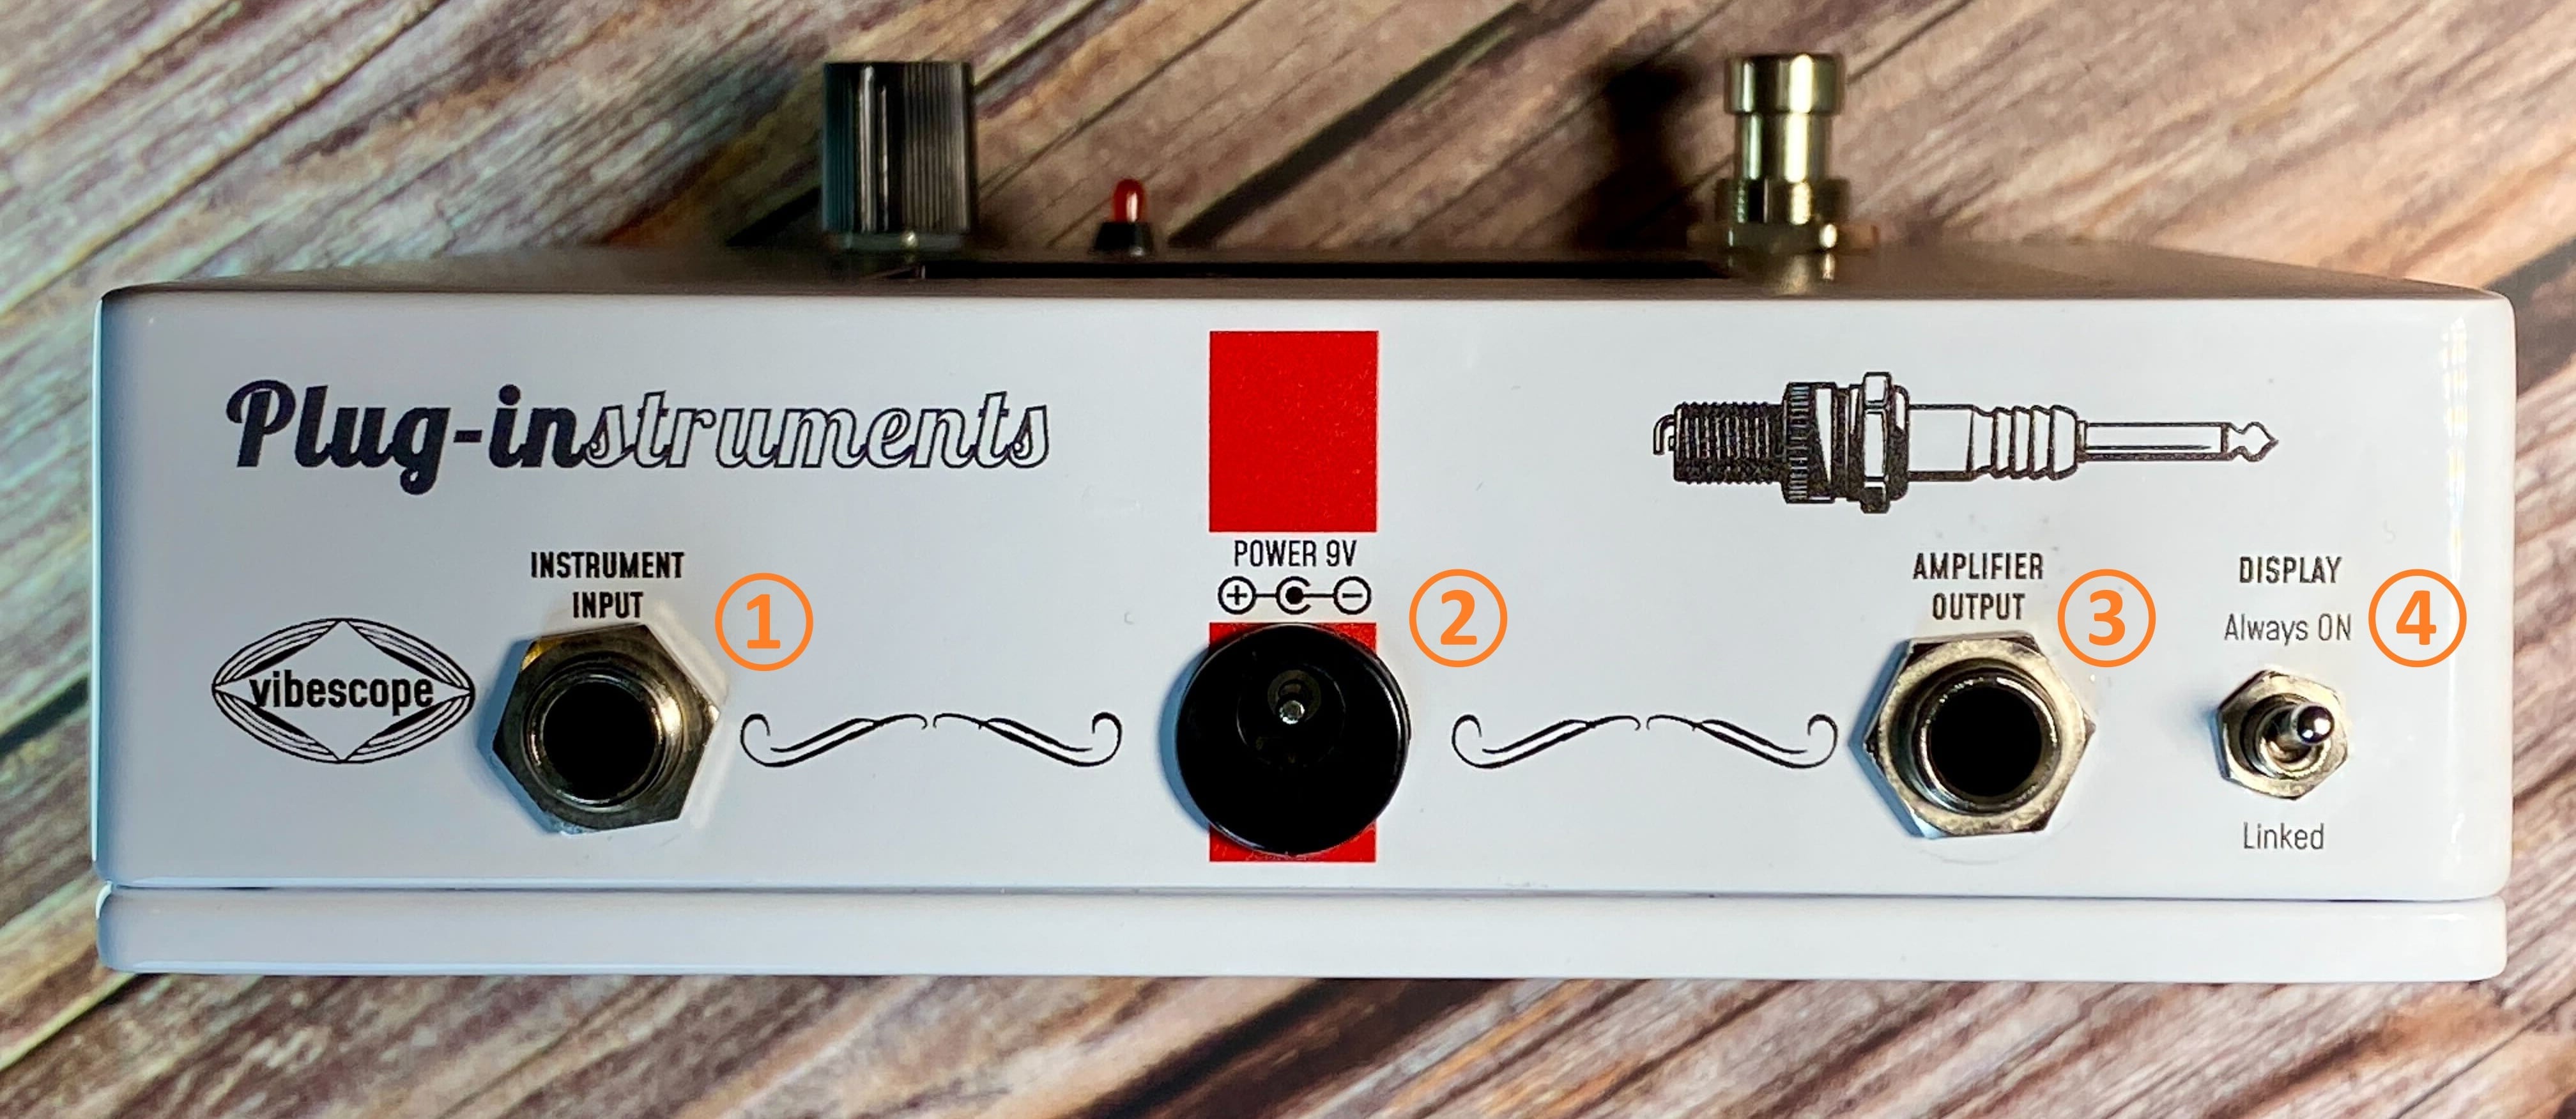
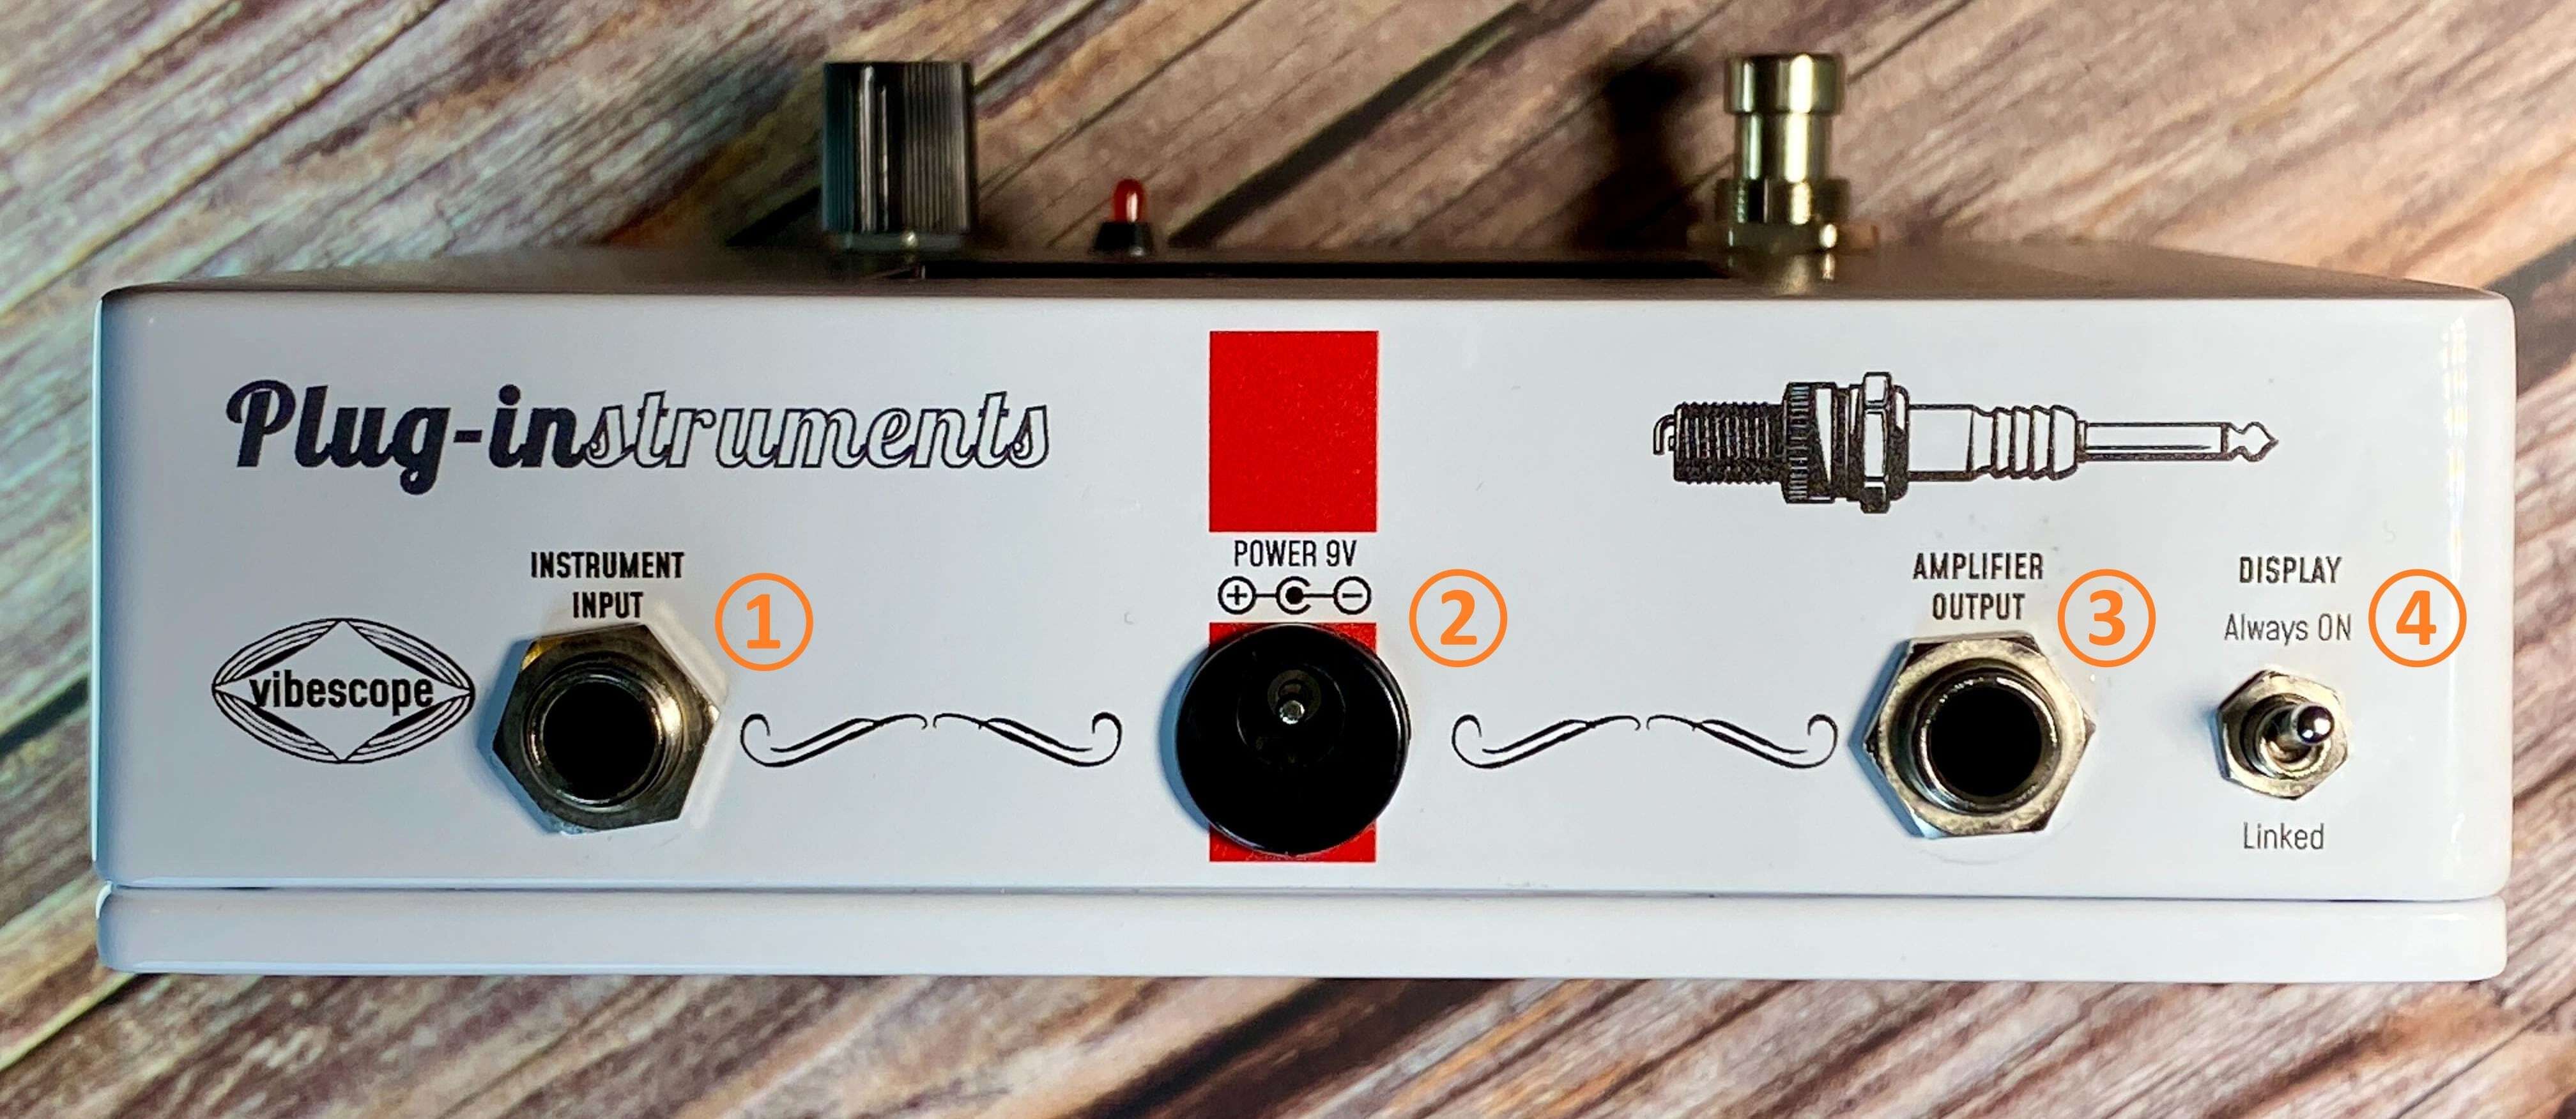
①インプットジャック
ギターなどの楽器やエフェクターからの信号を受け取る入力端子です。
★Point:様々なエフェクターの効果や出力音に近い波形を確認できるよう、Vibescopeはエフェクトチェーンの後段に組み込むことをお勧めします。
②ACアダプタージャック
別売りのACアダプターを接続する端子です。9Vセンターマイナスをご利用ください。
※電池駆動には対応しておりません。
※機器の特性上、使用状況などによりノイズが発生する場合があります。環境にもよりますが、アイソレート出力パワーサプライの使用を推奨します。
③アウトプットジャック
アンプや後続機器に信号を送る出力端子です。
④ディスプレイスイッチ
スイッチを上向きの「Always ON」にすると、フットスイッチのON/OFFに関係なくディスプレイが常時ONとなり、いつでも波形と分析結果が確認できます。
下向きの「Linked」にした場合は、フットスイッチがONの場合のみ画面も表示されます。
【正面】
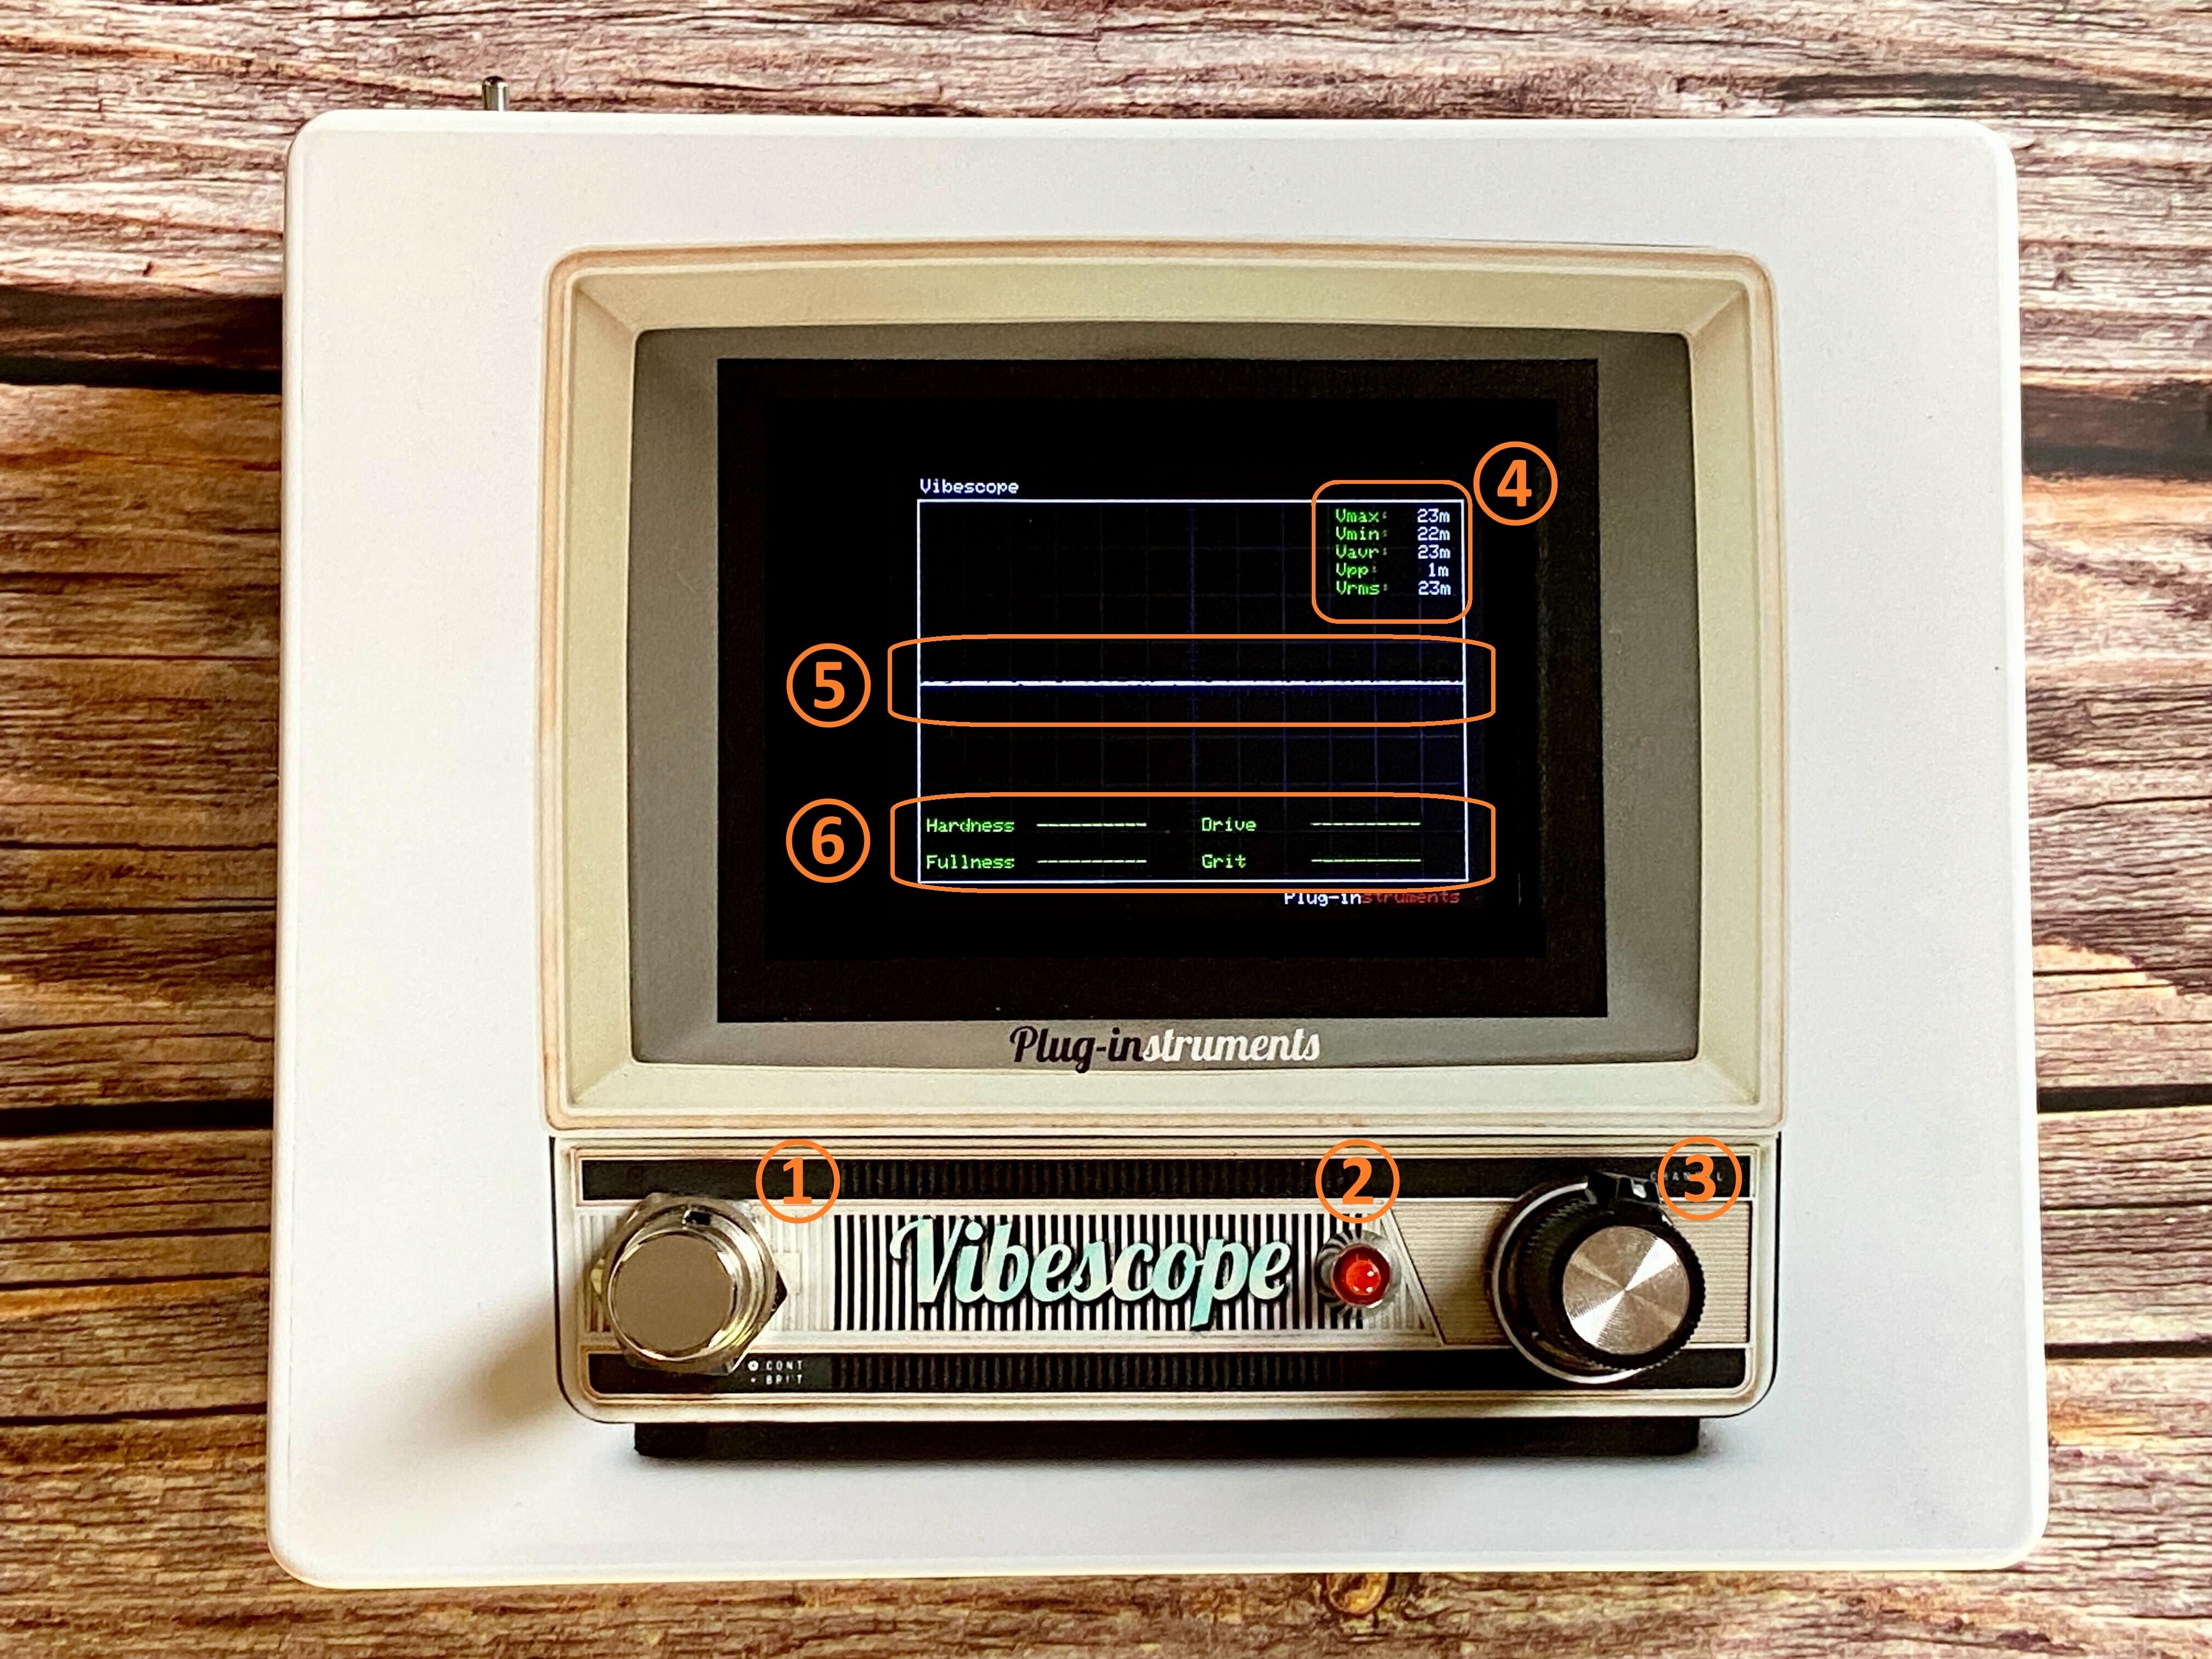
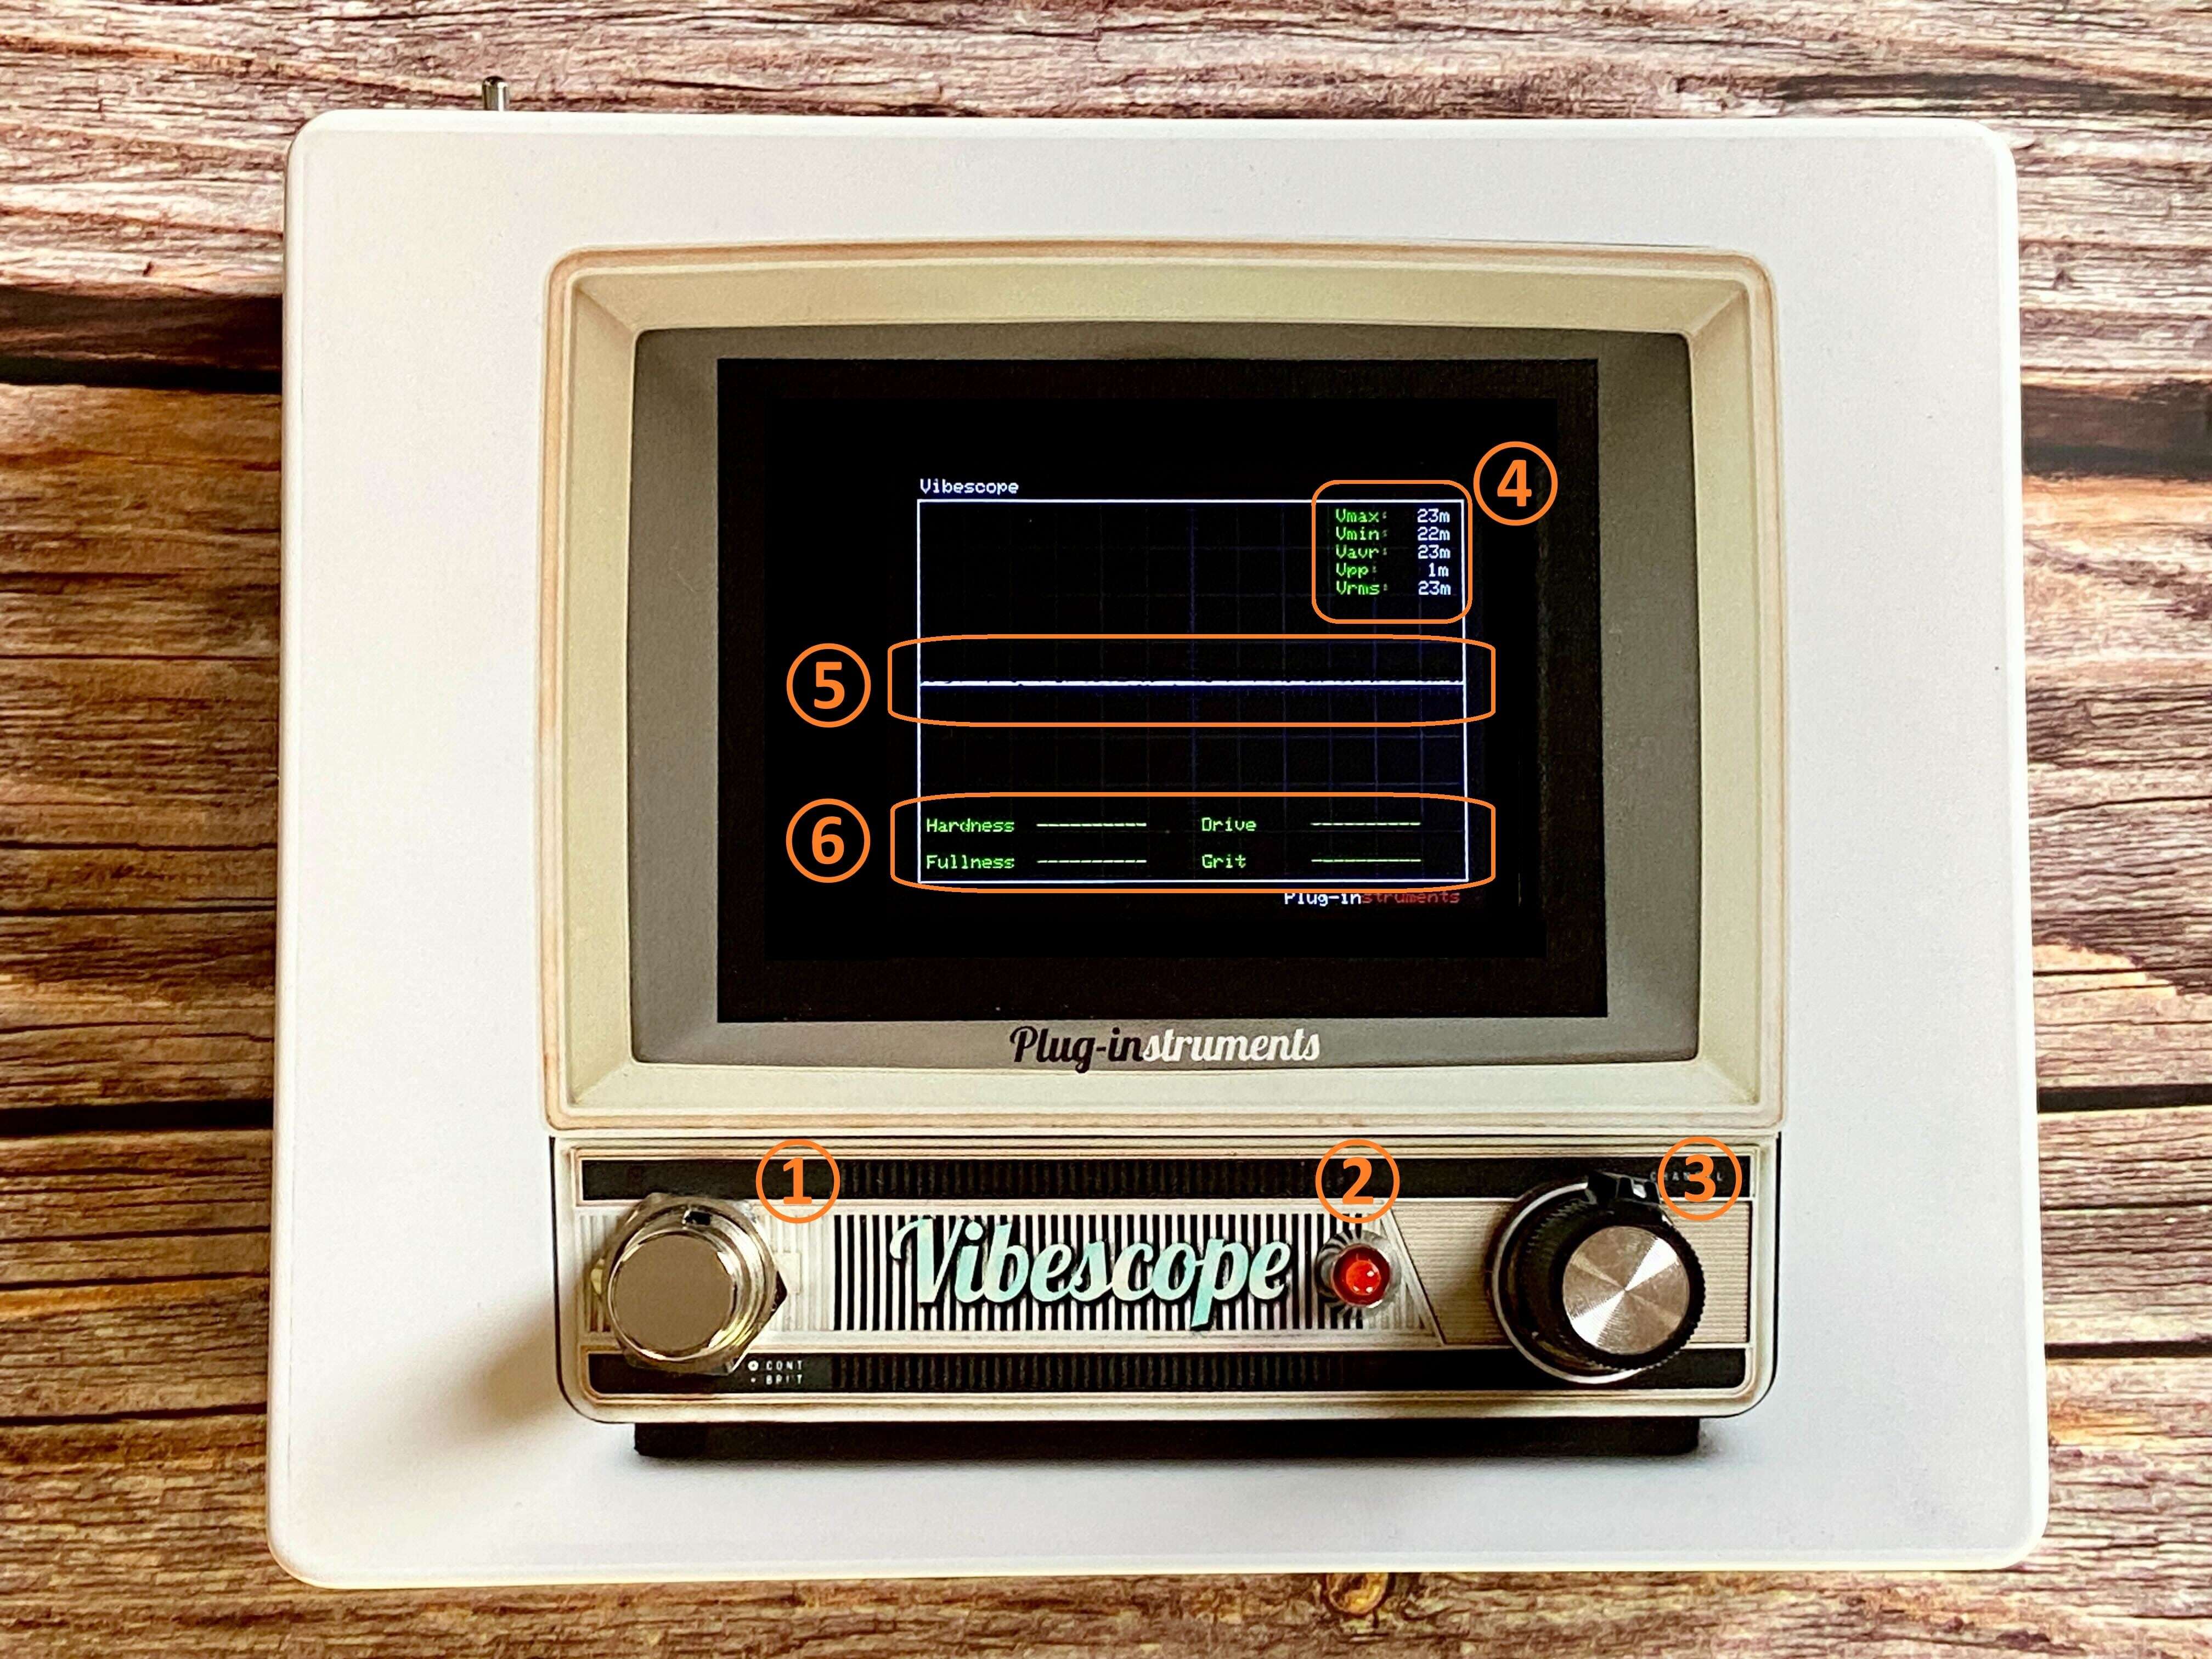
①フットスイッチ
クリーンブースターのON/OFFを切り替えるスイッチです。
上面のディスプレイスイッチが「Linked」の場合は、画面のON/OFFもフットスイッチに連動します。
(OFFの場合はトゥルーバイパスになります)
②ON/OFFインジケーター
クリーンブースターがONの場合に点灯します。
③GAINノブ
ノブを一番左に回すとトゥルーバイパス時より若干低めのレベルから始まり、頂点を超えたぐらいからブーストがかかり始めます。
★Point:クリーンブースト回路は分析ツールの前段に配置されているため、Vibescope自体でかけたブーストのかかり具合も、波形として画面で確認することができます。
(バイパス時の波形が大きすぎる場合は、クリーンブーストをONにしてノブで出力を絞ることにより、波形の大きさをコントロール可能です)
④「数値」表示部
【Vmax・Vmin】最大・最小電圧(V)。ピッキングの強さやエフェクターからの入力レベルなどによって変化します。
【Vpp (Peak-to-Peak Voltage)】最大電圧差(Vmax - Vmin)。信号の振幅の大きさを表します。
【Vrms】実効値(Root Mean Square Voltage)。波形のエネルギーに相当し、音の実効的な音量を表します。
⑤「波形」表示部
横が時間軸、縦が電圧を表しており、ここに表示される波形により音の特徴を大局的に把握することが可能です。
⑥「サウンドキャラクター分析」表示部
硬さ(Hardness) :音のエッジーさを表す指標
太さ(Fullness) :音の芯や太さを表す指標
ドライブ感(Drive) :歪みやブースト、強いアタックなどを表す指標
ハスキー感(Grit):細かくザラついた、ノイジーな状態を表す指標
★Point:サウンドキャラクター分析は波形をもとにしているため、評価はその瞬間瞬間で変化します。エフェクトはもちろん音程やピッキングニュアンスなどにも影響を受けますので、ロングトーンを複数回鳴らし、一定時間の大局的な傾向で音を判別するなどの利用方法をおすすめします。
注意:サウンドキャラクター分析は波形の数学的な判定を言葉で表現したものであり、波形によっては指標名にそぐわない結果を示すことがあります(例・クリーントーンなのにドライブ感が上がる、など)。
Vibescope user manual
Thank you very much for purchasing Vibescope or considering purchasing it.
Please be sure to read this manual before use so that you can use this effects pedal correctly and safely.
You can also find the product features and main specifications on our shop page, so please refer to it as well.
View on Store
【Top Panel】
① Input Jack
This jack receives the signal from your guitar, other instruments, or effects pedals.
★Tip: To view waveforms that closely reflect the effect and output sound of various pedals, we recommend placing Vibescope toward the end of your effects chain.
② AC Adapter Jack
This jack is for a 9V center-negative AC adapter (not included).
Battery operation is not supported.
《NOTE》Depending on the usage conditions and operating environment, some noise may occur. We recommend using a power supply with isolated outputs.
③ Output Jack
This jack sends the signal to your amplifier or to other effects pedals.
④ Display Switch
When the switch is set upward to “Always ON,” the display remains on at all times, regardless of the footswitch status, so you can check the waveform and analysis results whenever you like.
When set downward to “Linked,” the display turns on only when the footswitch is ON.
【Front Panel】
① Footswitch
This switch turns the clean booster on and off.
When the display switch on the top panel is set to “Linked,” the display on/off is also linked to the footswitch.
(When the pedal is off, the signal is true bypass.)
② ON/OFF Indicator
Lights when the clean booster is ON.
③ GAIN Knob
With the knob turned fully counterclockwise, the level starts slightly lower than in true-bypass mode, and as you turn it past the center region it begins to apply boost.
★Tip: Because the clean boost circuit is placed before the analysis section, you can also see how much boost Vibescope itself is adding, directly as a waveform on the display.
(If the waveform is too large when bypassed, you can turn the clean booster ON and lower the output with the knob to control the displayed waveform size.)
④ “Numeric Values” Display Area
Vmax / Vmin: Maximum and minimum voltage (V). These values change according to picking strength and the input level from your effects.
Vpp (Peak-to-Peak Voltage): Maximum voltage difference (Vmax − Vmin). Indicates the amplitude of the signal.
Vrms: Root Mean Square Voltage. Corresponds to the energy of the waveform and represents the effective loudness of the sound.
⑤ “Waveform” Display Area
The horizontal axis represents time and the vertical axis represents voltage.
The waveform displayed here allows you to grasp the overall characteristics of the sound at a glance.
⑥ “Sound Character Analysis” Display Area
Hardness: An indicator of how edgy the sound is.
Fullness: An indicator of the body and thickness of the sound.
Drive: An indicator of distortion, boost, and strong attack.
Grit: An indicator of fine, grainy roughness and noisiness.
★Tip: Because the sound character analysis is based on the waveform, the evaluation changes from moment to moment. It is affected not only by effects but also by pitch and picking nuances. We therefore recommend, for example, playing several long, sustained notes and judging the sound from the overall tendency over a certain period of time, rather than from a single instant.
Note: The sound character analysis converts a purely mathematical judgment of the waveform into descriptive terms, so in some cases the result may not seem to match the label of the indicator (for example, the Drive value may increase even for a clean tone).